

After Care of Permanent Makeup
Before your appointment
Ensure you adhere to following recommendations for best results
● Take a break from retinoids, glycolics, and vitamin C serums among other good stuff for 2-weeks before your session.
● 24 hours to your appointment avoid taking alcohol, blooding thinning meds, and caffeine.
● Any treatments such as lasers, peels, waxing, botox, etc should also take place 2 weeks prior.
● Have healthy skin with no irritation, sunburn, or blemish for the best result.

AFTERCARE
THE BEST WAY IS TO NOT DO MUCH!
Please read all aftercare instructions on this page to make sure you can commit to this brow journey, especially the first 10 days. How you take care of your fresh brows greatly affects the healed outcome.
Simple Rules to follow for the Best Results:
NO MOISTURE! NO WATER! NO SWEAT! NO SUN! For 10 days.
The best results come from the "Do Nothing" or "Dry Healing" method. The absolute best results come from keeping your brows extremely DRY for the next 10 days! Keeping them dry enables them to retain more detail, better color, and more crisp strokes, so it's worth it :) It sounds tricky- but can be done if you're mindful of it. Here's how...
● Within 2-3hrs after the procedure using sterile water to wash off the ointment and gauze pad in your kit to dry off your brows. That’s all for the next 10 days.
● Avoid getting your face wet when taking a shower or while washing your hair. Keep clean, dry paper towels on hand to pat dry if they accidentally get moist. Last, make showers brief to avoid steam.
● While washing your face, use cleansing wipes to clean around your brows to keep them dry. That said; avoid splashing water on your face.
● Use product free blotting paper 3 times a day for normal skin and 6 times a day for oily skin directly on top of the brows and then the surrounding area for the first 10 days as well.
● Avoid cosmetics but if your skin needs it urgently after about 7-days, use products like Coconut oil or a fragrance-free moisturizer, such as Cetaphil to sparingly moisturize around your face.
● To retain the best color and details avoid sweating during these days (No heavy-workouts).
● After 10-days, you are free to be your whole face including browsing freely using gentle wash like Cetaphil.
What to Expect
● After the procedure, the tattooed section will turn darker and bolder with a sharp appearance. This effect will last a week alongside the healing. Also, you may experience sunburn-like discomfort with a slight redness in that area.
● During the initial healing period, there may be scabbing, flaking, or peeling of the skin. When you experience this, avoid scrubbing and allow it to peel on its own. Scrubbing can remove the pigment.
● The complete healing takes 4-6weeks. During this, the tattoo will soften and lighten. Be patient if you notice color fade as your skin is actively regenerating and exfoliating naturally.
● This is a two-step process. Brows look finished after the 2nd appointment.

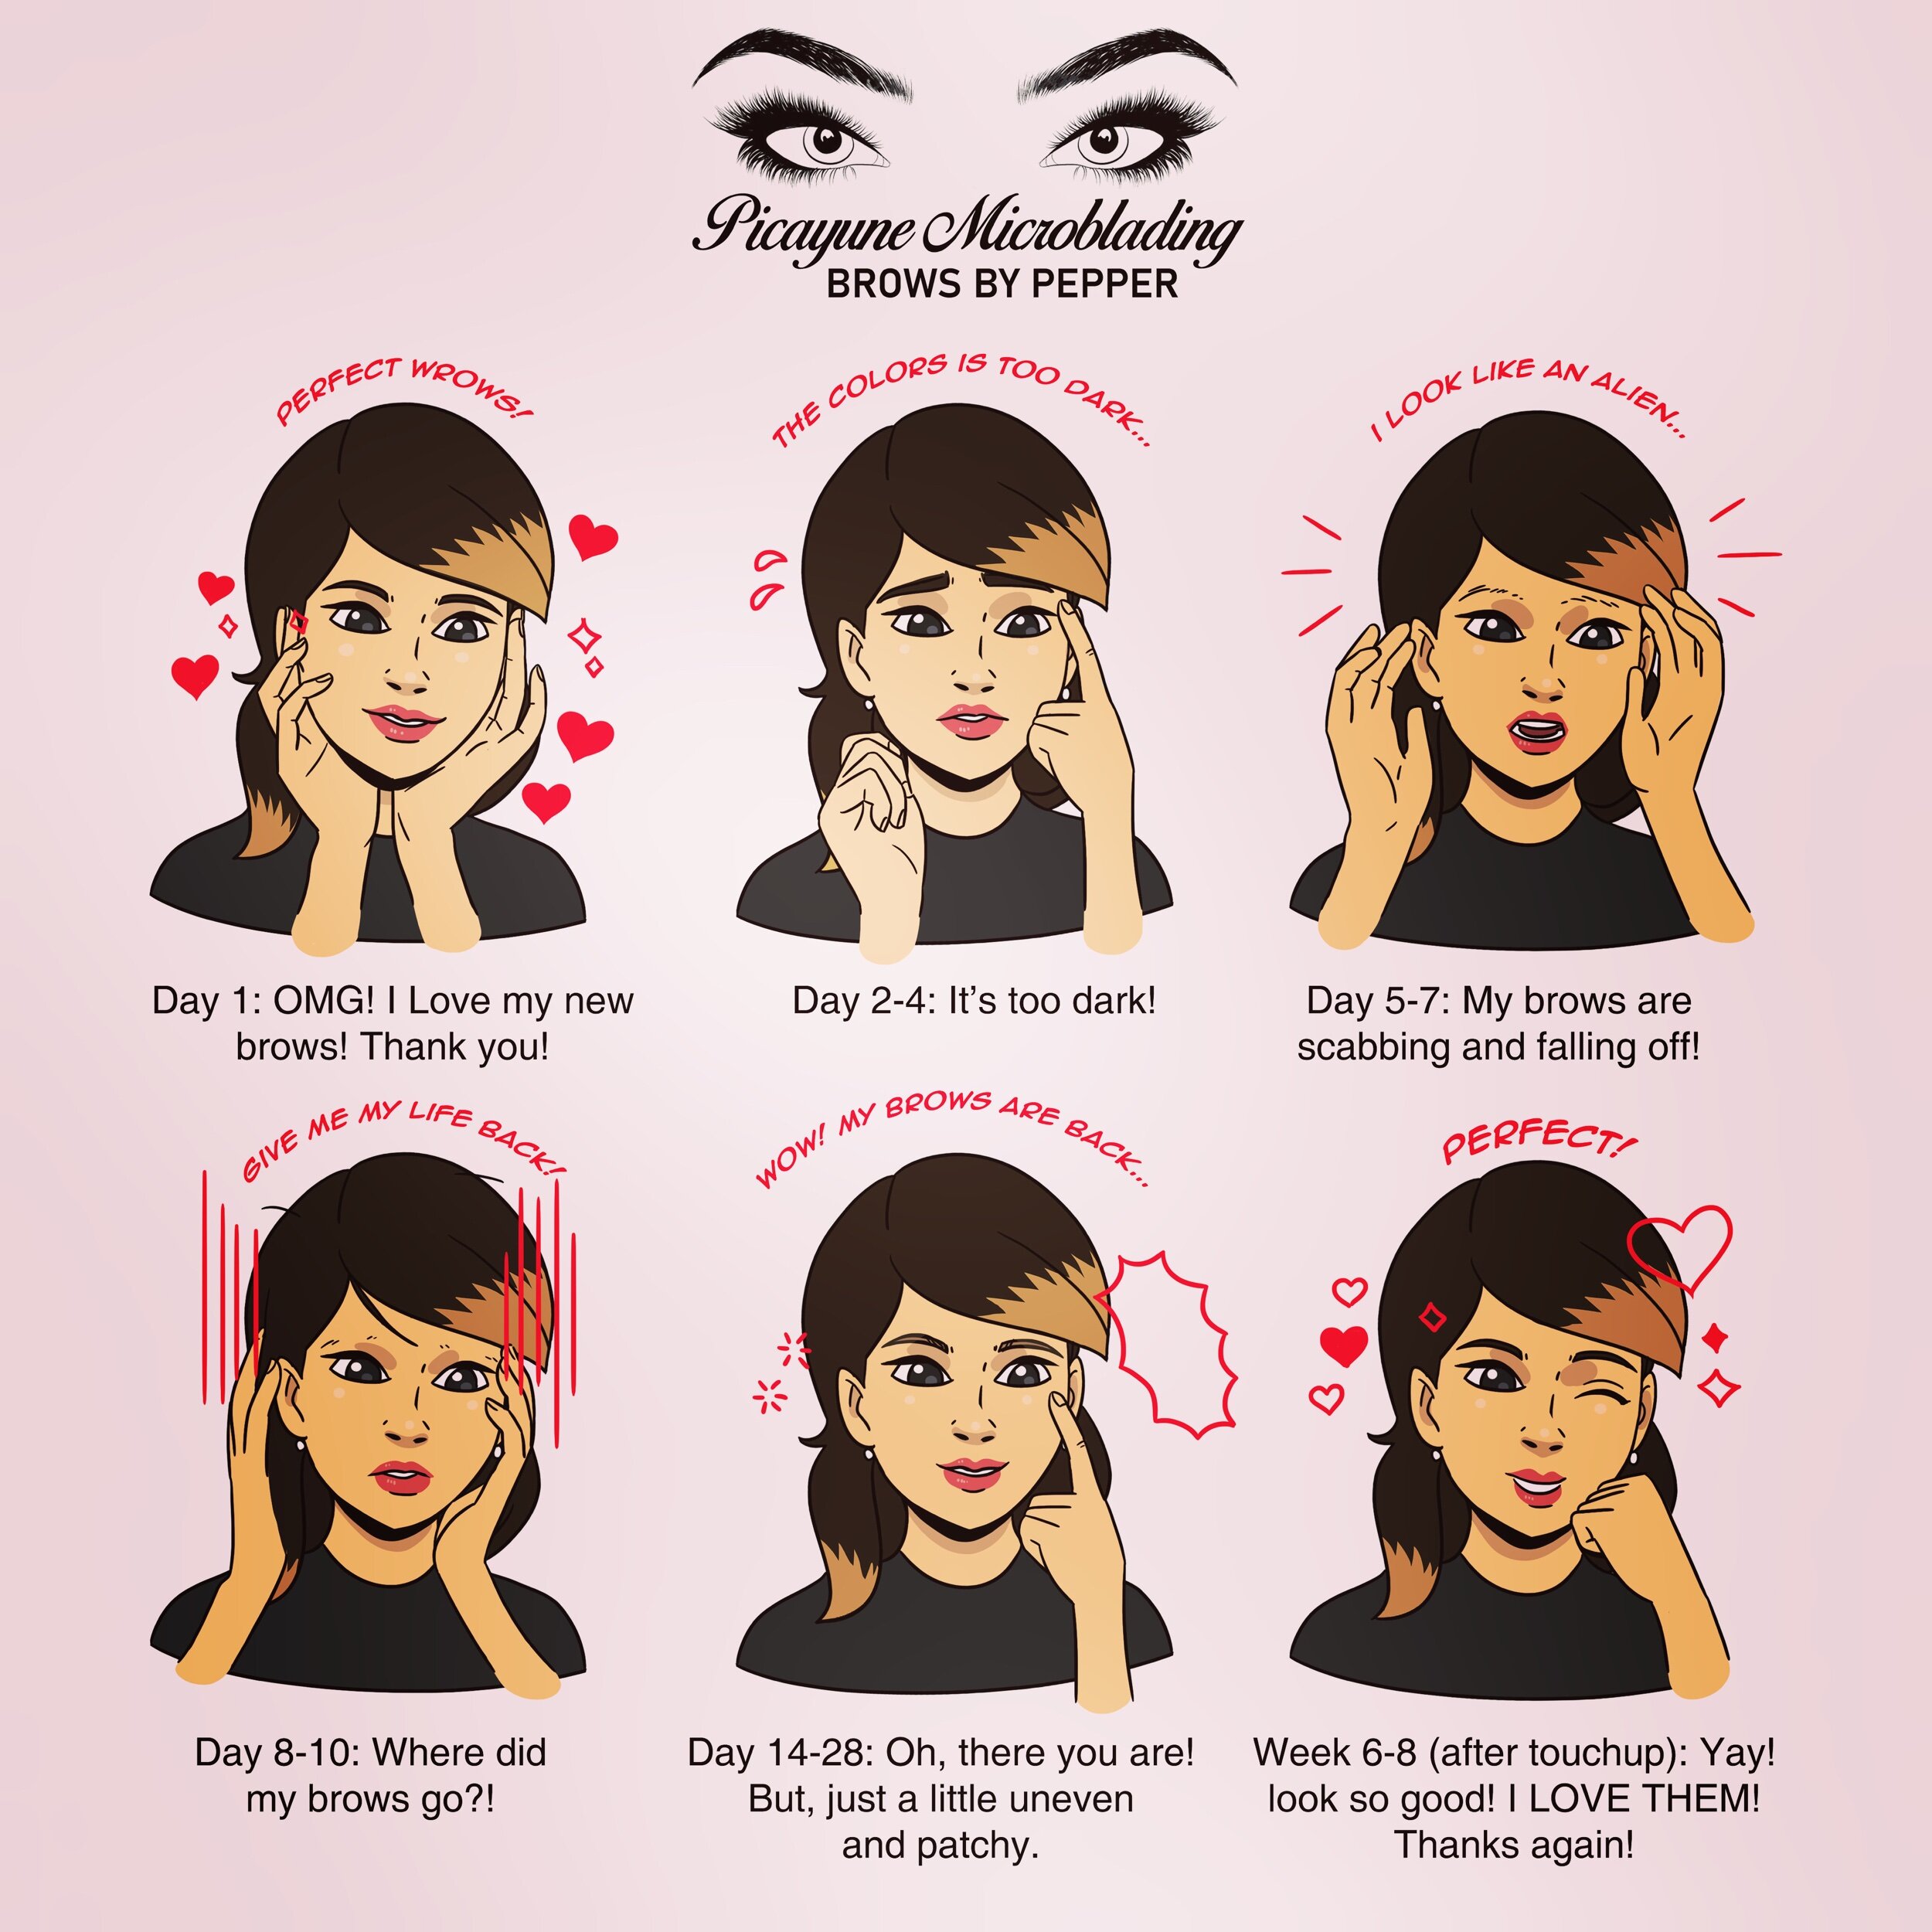
MICROBLADED BROWS GO THROUGH MANY PHASES WHILE HEALING! CHECK IT OUT SO YOU KNOW WHAT TO EXPECT...
Day 1 - finely detailed, slight redness
Day 2-4 - They become darker and more filled in looking as they form a light protective layer or scab. This is only temporary- don't panic!
Day 5-12- The protective layer naturally exfoliates, peels and flakes away for several days as your skin heals underneath it. The freshly healed skin is white and has a waxy coating, making it appear that the brows are too light. Be patient!
Day 10-30 - After 10 days you may use brow makeup very gently if you need it. The color will slowly come back to life and bloom back to the surface as like new, white skin settles in and heals. Wait at least 4 weeks to see the true color, as it will take on new strength, and it is only after 4 weeks that your touch-up/adjustment can be done.
Your second appointment is to tighten up your shape, touch up any light spots, and also to evaluate how your skin reacts to the process and the chosen color. We note everyone's pigment blend, in case we need to layer in a different shade or adjust the method for the best results :)
What Not to Do
Avoid:
● Use of sharp soap, shampoos that can affect pigment stabilization by affecting the bonding process
● Picking/scratching off the peeling skin. It should occur naturally to avoid scrubbing off the pigment alongside the skin.
● Using brow makeup in less than 10 days after the procedure. This will interfere with normal healing.
● Use of petroleum-based products like Neosporin and Vaseline among others
● Bleaching, dying or tinting the tattooed area in less than a month
● Use of anti-acne products with Benzoyl Peroxide, Salicylic Acid, etc, or lightening creams with hydroquinone on the treated area.
● Use of anti-aging facial products with Glycolic acids, Retin-A, Lactic, or Alpha Hydroxyls during the healing
● Threading, waxing, or using hair removal products on the treated area during healing.
● Sweating through heavy workouts or any other means a day to or within 10 days after tattooing.
● Sun exposure, swimming, Jacuzzi, sauna, or other water activities for 2-weeks.
● Soaking your face in the bathtub or under the shower in the next 2-weeks
ONCE HEALED
● Use sunscreen on the treated area or hat with sunglasses regularly and this is because the sun will fade the pigment over time. Also, rinse and dry when in contact with chlorine.
● Avoid applying anti-aging products, Glycolic-acid, micro-dermabrasion, and laser treatment among other products/services that could lighten the pigment.
● If you choose laser resurfacing or hair-removal inform the laser technician about your tattoo. This treatment can either lighten or darken the pigment.
● After healing, follow-ups, changes, or additions on that area can be done after 6-8 weeks. By this time the skin cells are healed and fully regenerated.
● There are no guarantees about the tattoo and everyone heals differently. So you need to take care of your tattoos.
THIS PROCEDURE IS NOT RIGHT FOR YOU IF
● You are using ACCUTANE or have used it within the past year
● If you have very oily skin and/or very large pores on your forehead the hair stroke pigment may be rejected or it may heal very powdery and fuzzy with loss of detail and may need frequent touch-ups. Often powder shading or a combination brow is a good replacement!
● if you want very thin brows (there needs to be at least a slight thickness to achieve desired hair-like detail)
● If you are very tan or sun-damaged
● If your skin is very delicate, fragile, sensitive, or problematic. The older we get the more fragile and thin our skin gets. People aged over 70 may not have the most ideal results and may experience loss of detail, discoloration, or additional blurring
● are pregnant or nursing
● are allergic to Lidocaine
● are highly prone to scarring or keloids
● are epileptic
Process / FAQs
What’s it?
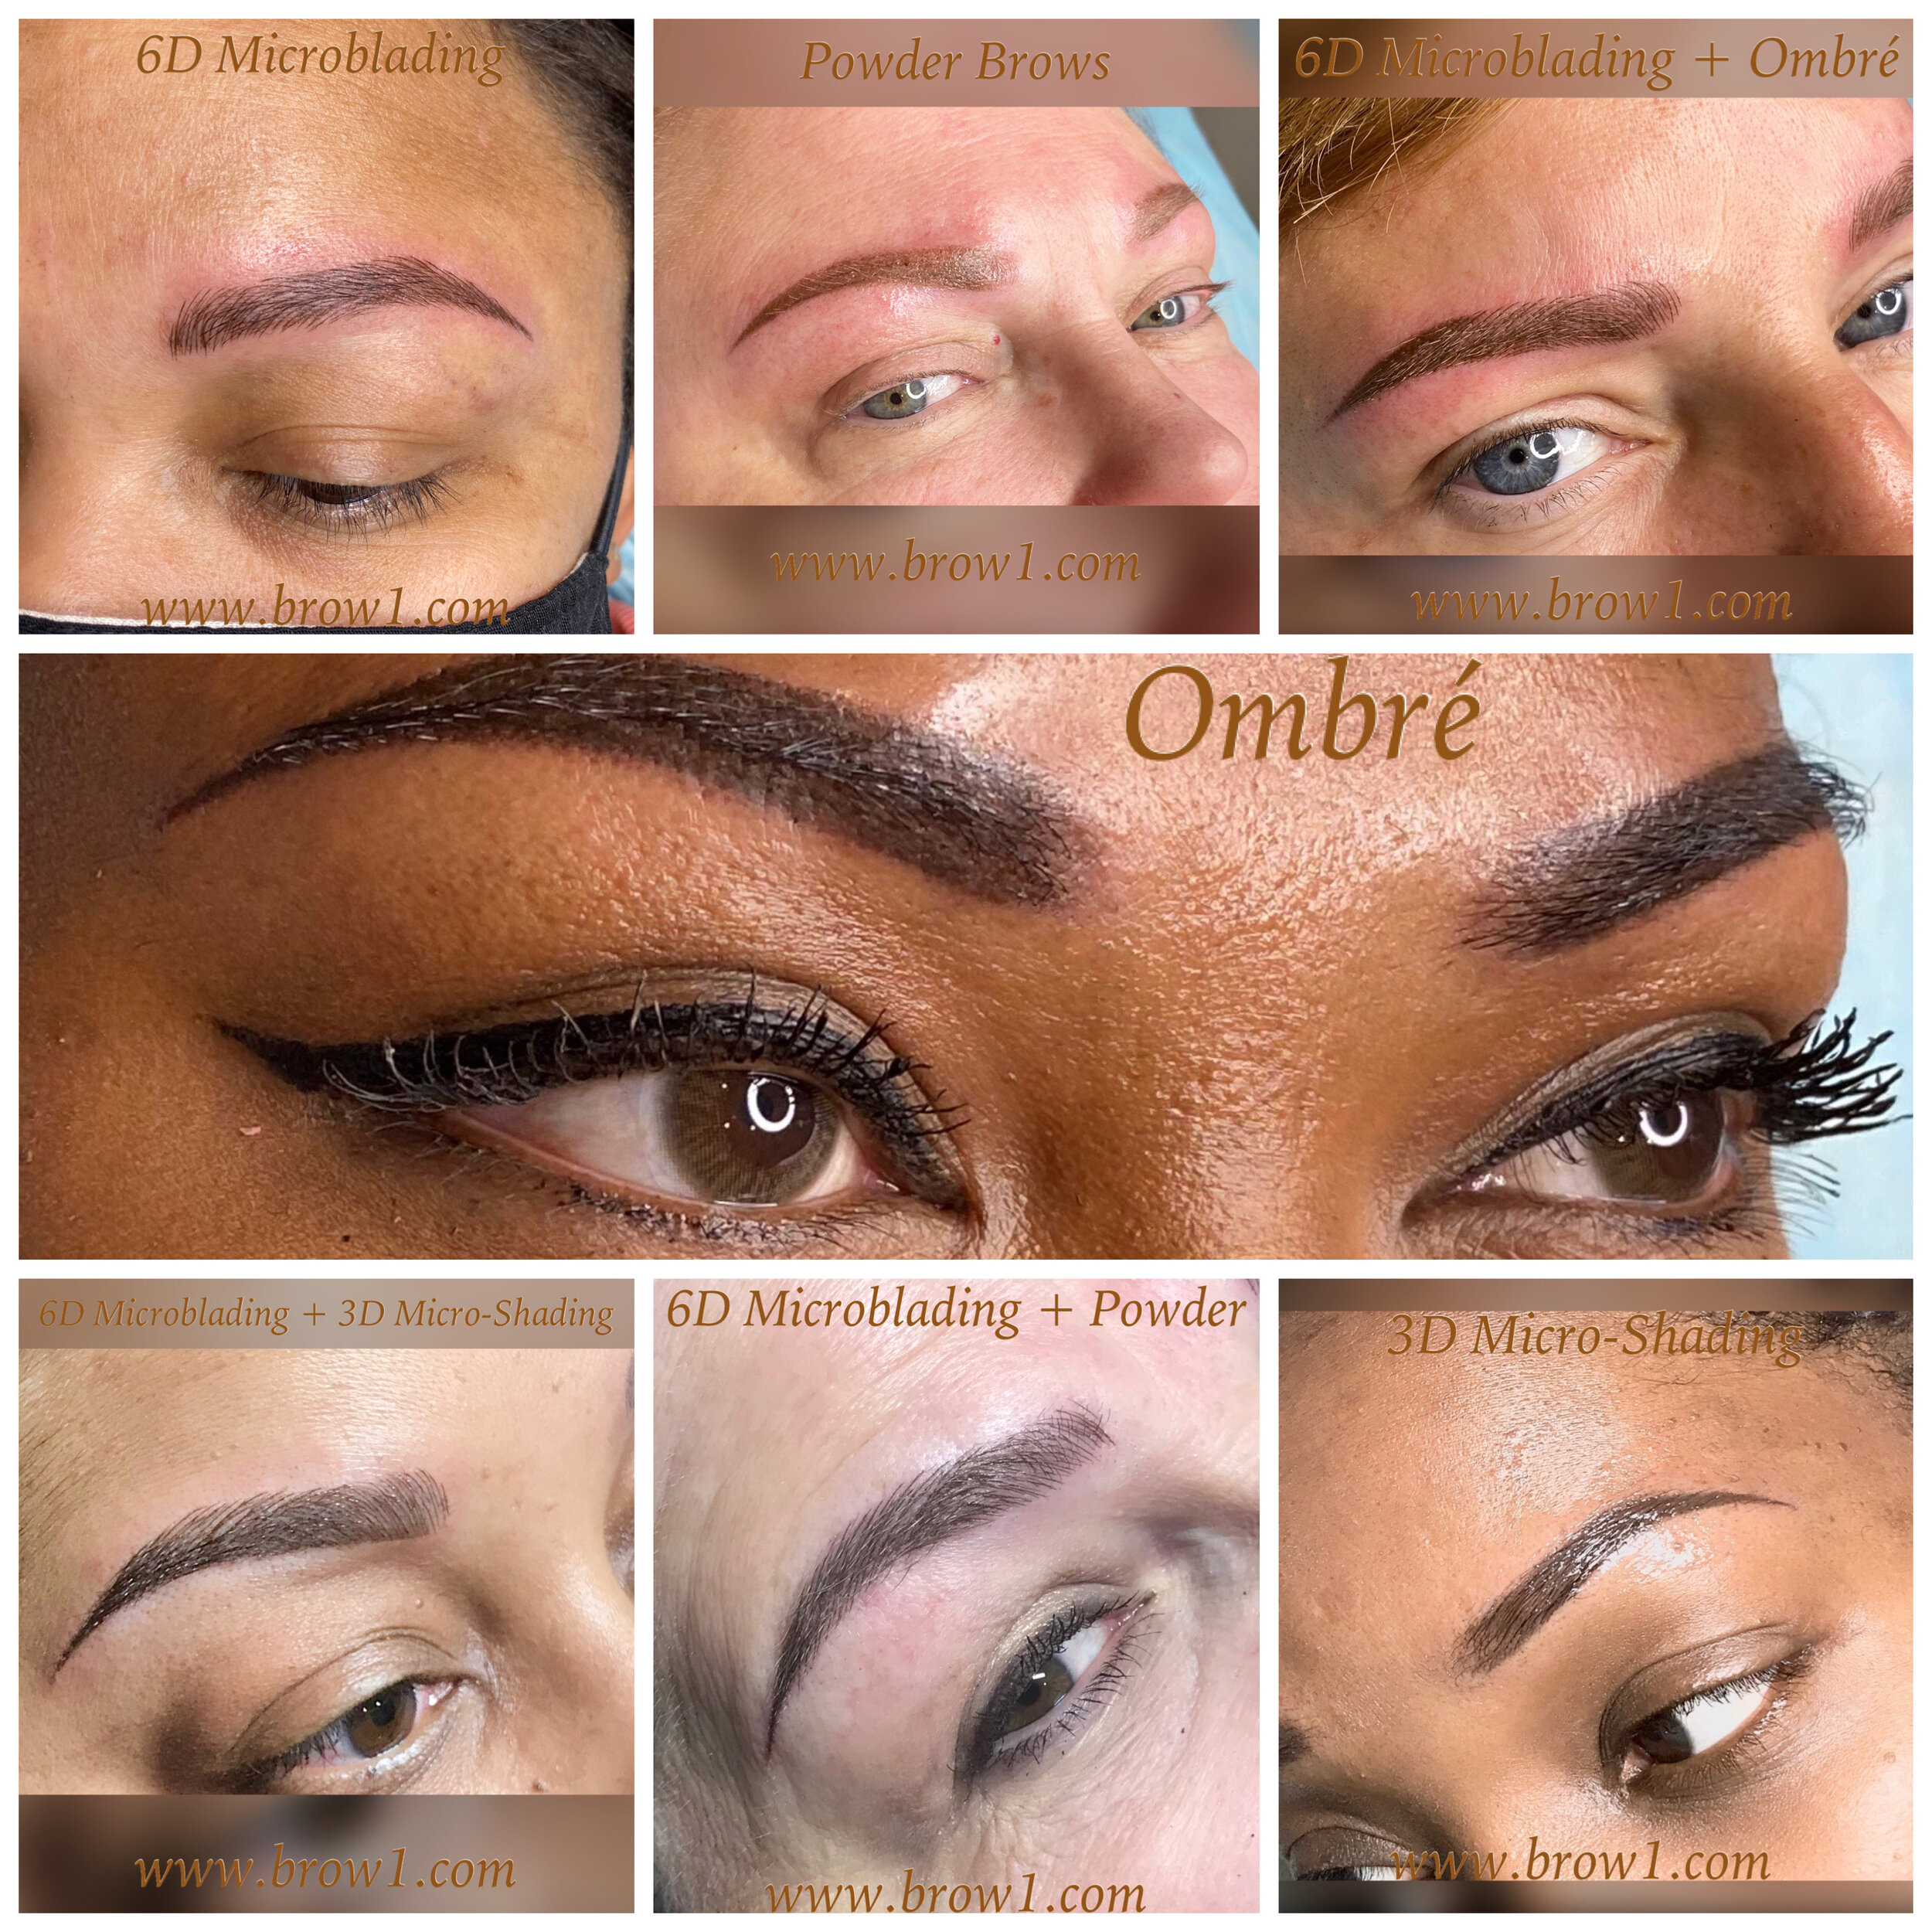
Microblading is a form of cosmetic tattooing. It is the process of applying tiny, individual hair-like strokes, following the directional growth of natural eyebrow hair, to create a semi-permanent tattoo that looks more realistic.
This tattoo is made with a hand tool and not a machine, creating a soft effect that can eventually partially or fully grow out over time. The pigment is deposited in a more shallow fashion than conventional tattooing.
What is Necessary?
You need two appointments for perfect eyebrows, thus one session is rarely enough. The first session often ends with lightness and inconsistencies. But with Pepper’s specific technique in the second session, you get a complete, perfects, and natural look.
Do results Vary?
Yes - color retention and overall results are different for each individual. Factors such as sun exposure, SKIN TYPE, FOLLOWING AFTERCARE, lifestyle, immune system, and skin tone determine how your brows heal.
OILY SKIN- tends to 'push out' the ink quicker, and may need more frequent touch-ups and heal extra powdery/blurry.
DARKER SKIN– fewer contrast results with a powdery or solid look than lighter skin.
MATURE SKIN- unpredictable results since it’s fine, delicate, and thin.
Final results are often unpredictable and may not replace the bro make-ups permanently. So you may need powder and pencil at times. After all, the prime goal is natural and balanced brows
Is there a contrast between Fresh and Healed Brows?
Yes, hair strokes appear crisp and exaggerated at first, and brows will be dark for a few days after each treatment. As the brows heal, the lines will slightly expand and are lighter, slightly fuzzy, and softer looking. As the color settles into the skin it tends to heal a bit cooler than when first applied.
Is there a need to remove Natural Brows before this process?
No! Please don't! This technique looks best when there's natural hair in place. It creates a more realistic look when layered with the texture of your hair. Without hair it forms a 2-dimensional image, the hair adds the 3D block appearance.
Why two sessions?
● 1st Appointment- "FOUNDATION SESSION” Brow mapping to create shape and symmetry according to your face- Also, the desired thickness and desired ‘look'. Application of a natural hair stoke pattern. Strokes are applied by hand with a single-use disposable tool and the area is numbed for minimal pain. Brows are quite dark for the first week and soften as they heal over the next month. The result relies on your skin type and healing process and is never perfect.
● 2nd Appointment – perfecting sessions after 6-8 weeks of healing. To touch up any light spots, build additional texture, add hair strokes or tweak and perfect the shape.
How often is a redone possible? And what’s the cost?
This is a semi-permanent process. It will fade over time, to varying degrees. A touch-up or "REFRESH APPOINTMENT" is recommended at least once every year to keep brows looking their best. Please check our pricing page for the most current touch up cost for regular clients!
PERMANENT MAKEUP AFTERCARE – EYELINER
The eyes are the “window of the soul”. We all want thicker and fuller eyelashes. Yet, for some reason, few people other than the very young can keep their eyelashes from losing their long and thick appearance and some even lose most or all of their lashes. A lash enhancement gives the natural look of fuller lashes and is part of the eyeliner procedure.
Pre-Procedural Considerations
● If you use or have used Retin-A, Accutane, or any other skin medications, please advise the technician.
● 24hrs to procedure avoid alcohol, caffeinated products, aspirin, or blood-thinning medications.
● Remove or clean off your makeup thoroughly before the procedure
● Pain preparation- even though the procedure causes minimal pain, some cliently may respond differently. Thus, you can ask your physician for a painkillerprescription that will not interfere with the procedure.
NOTE: avoid driving for the rest of the day after the procedure
Post-Procedure - After Care
The “aftercare” procedures are as important to the retention of the pigment as the actual implantation process. During this period, the primary objective is to allow the bonding process to be completely sealed inside the dermis. Your compliance will ensure that you receive maximum benefits from the procedure and reduce inconvenient follow-up visits.
Reserve your judgment until after 3-4 weeks following the final procedure. And please, take note, immediately after the procedure, your eyeliner may appear harsh and painted on. But as it heals, it will soften and appear natural (Be patient).
The intensity of the procedure is most prominent following the procedure itself. Over the next 3-7 days, the outer layer of color will appear crusty and start to flake off. Special care should be exercised while the treated area is healing.
Under no circumstances should you pick, scratch, or rub the treated area or attempt to remove the crusty material. Removing the crusts may result in the removal of the actual pigment and/or infection may occur. This protective “cover” must stay on during the healing process (three to seven days).
As the outer layer flakes off, you will notice that the color is lighter and softer, and the treatment may appear to be slightly thinner than the original day of your procedure. For the following two weeks, the color that was implanted under the skin will move forward. After three weeks, your healing process should be complete.
● If you wear contact lenses, do not replace them for the remainder of the day or the next 2-3 days.
● Use ice to prevent swelling and numb pain in the first 24-hours. Thereafter, it’s not useful
● Avoid soap, and cleanser shampoo in the next 7-days as they can interfere with the bonding process.
● All cleaning should be done with a clean Q-tip dipped in cool water and gently dabbed on the treated area. Do not rub the area in any way.
● For fast healing and moistening, apply A&D ointment, if you are not allergic to it, with a Q-Tip in the procedure area for the first 24 hours. Then for the rest of the week apply Vitamin E oil or liquid, again with a Q-tip. Avoid using fingertips to prevent infections. Avoid petroleum-based products and mineral oil.
● Do not let the treatment area dry out
● If any form of redness, tenderness, drainage, fever or rash occurs, please contact Picayune Microblading or your health care provider immediately.
● Avoid soaking the treated area through steamy baths, showering and swimming or any excessive exposure to water for the next 14 days.
● Avoid touching, scrubbing, or wash the affected area as this may cause infections.
● Avoid sunshine exposure for at least 14-days.
● Avoid cosmetics for 7-days and the same applies to non-allergic makeup since they may interfere with the bonding process.
● When it’s time to use mascara, get a new tube to prevent infections.
● For pain relief consider OTC Tylenol.
● Retin-A can lighten or peel the skin so avoid getting it close to the treated area.
● Allow the skin peeling to occur naturally. Scrubbing can remove the pigment as well.
● If you notice anything unusual or have an inquiry, feel free to call.
● Adhere to the recommendations to get the best outcome.
● After three weeks, you should be healed and you are free for touch up. You can do this free touchup after 3-6 weeks, but thereafter, there is an additional charge.
● In case of any infection, get in touch with Picayune Microblading or healthcare providers.
After Care specifics to Lips
In addition to the general aftercare instructions, please follow these specific lip instructions.
● Use aftercare products only until full recovery (No makeup, water, cream)
● After your procedure, your skin will start forming a protective scab. You may see fluid or ooze on the skin from lymph secretion. The fluid should be dabbed and blotted off with a sterile gauze pad. It can crust the skin over and prevent it from breathing and healing.
● After 24 hours, clean the treated area daily with mild warm water and non-alcohol soap. Blot 4 to 5 times to clean, then blot completely dry. Use patting motions only. No Scrubbing, rubbing, wiping, or scratching.
● Lips will ooze for a couple of days and peel for a week or so. After sleeping, the crust will have dried on the lips. Blot with water. Clean and apply aftercare products as directed. Try not to disturb the crust when cleaning and let it fall off by itself. The edges or lip liner will be the last to fall off. Pulling this off will result in an uneven splotchy line or an indented scar.
● Apply aftercare products on the clean and dry treated area. Place the ointment on the scabs that are beginning to form. Placing in a moist area will cause irritation or infection.
● Use the aftercare product to maintain your lips moist for the next 3-weeks. When all scabs are over, discontinue it. Thereafter, use appropriate sunblock and lip balm.
● After the procedure, use a straw to drink fluids and fork to eat. Avoid fluids or food touching your lips.
● Avoid spicy, hot liquid for 48 hrs as well as oily food, acidic or salty food while healing.
● For 72hrs, use water only to brush your teeth
● Until full recovery, avoid bleaching your teeth
● Avoid straining your lips through pucker lips when smoking or with big smiles

Days (1-27) and What to Expect
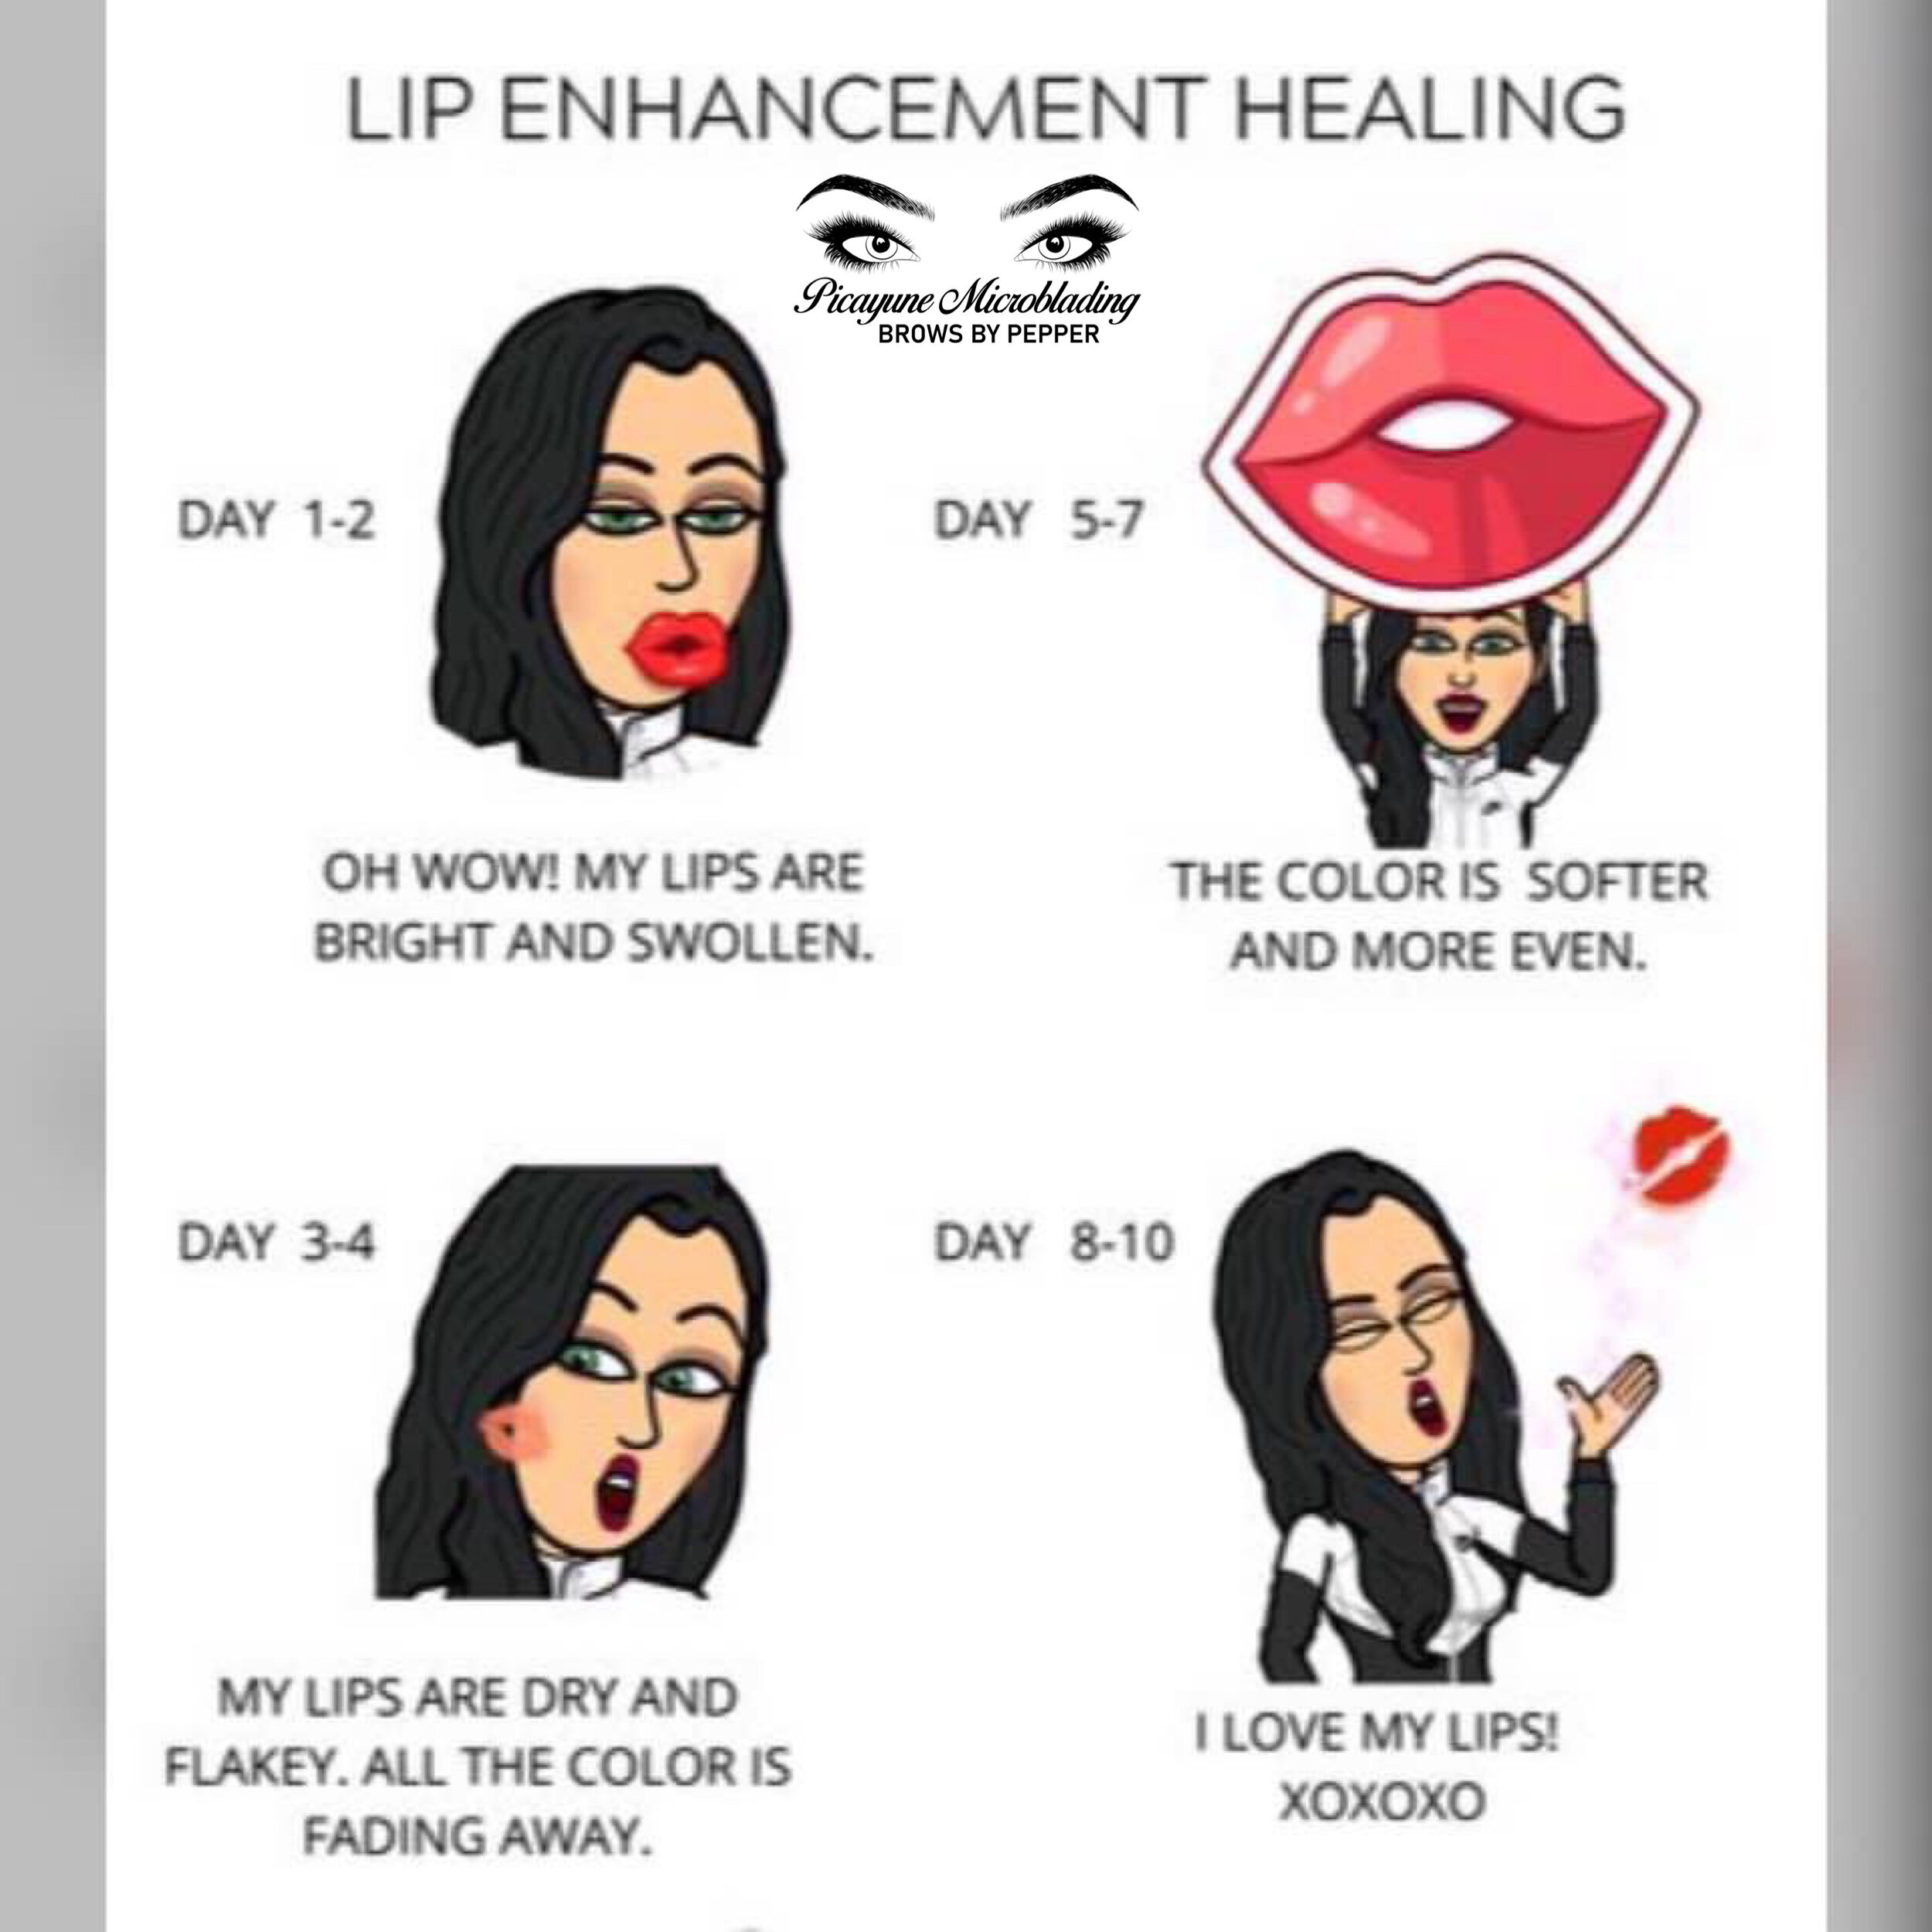
1. These lips have swelling, are tender, and have a heavy, thick lipstick look with a reddish brick color. For the first few days, the color is darker than it will appear when healed.
2. Lips will have mild swelling, reddish, tender, and with a mild metallic taste.
3. Less swelling on lips, thick texture, orange, sore with a hot feeling (Pre-exfoliation process)
4. Exfoliation begins with very chapped lips. The color will become lighter as the epidermis sloughs off. It will appear that lips have lost all of their colors during this phase of healing; however, when lips have healed completely, the dermal layer will gradually become darker.
5. Chapped lips but close to the end of chapping in healing in this phase
6. During this phase, a soft, rich color begins to appear in the lips
7-13 the lip color disappears in this phase while a 2nd chapping phase starts like a whitish-gray haze on your lips
14. Gradual color bloom until day 21 (3-weeks post-procedure)
21. End of healing and the final lip color are what you’ll have. Also, use a good lip balm as your lips will remain dry for 1-2 months.